Showing posts with label diy. Show all posts
Monday, January 25, 2016

DIY Headboard

While decorating my sons room I knew I would need a headboard and knew that I would make it but I wasn't sure what exactly.  Then the picture started in my mind.  I wanted something rustic and was thinking something with corrugated metal. But then I ran upon some wonderful old barn wood.  So this is how we started. 

We measured the size of the bed, which was a queen.  Then built the frame from 2x4's.  I wanted a little more rustic look so my dear hubby scraped the edges then we sanded it.

Used some scrap plywood for the back and began putting the barn wood in.  Cutting it on an angle and fitting it in one by one.  

 
We then dropped the back out of the frame and stained the frame with dark walnut.  I also used a spray on polyurethane for the top coat.  Then we put it back together with the inside barn wood section.  And wa la, it was perfect for his "hunting" room.  Quite simple and very inexpensive.  Only had to buy the 2x4's, less than $10.  Fun project and inexpensive.  A success!
Thanks for stopping by.


Linking with these great parties:
  Trash 2 Treasure
Tutorial Tuesday
Wow us Wednesday
Treasure Hunt Thursday
Grace at Home
Link Party Palooza
Funky junk interiors
That DIY Party
MMM Block Party
Inspire Me Monday
Monday, November 23, 2015

DIY tray


I bought this awesome tray at Rod Works.


I love how unique it is and I use it in my entry on the dresser.  I wanted another one but didn't want to pay for another one.I think it was like $32.  I decided to make one myself.  Went to Home Depot and got a 1 x 4 x 6 pine board.  Then off to Hobby Lobby for some awesome handles.  Just needed some glue, finish nails and my chop saw.  Here is what I came up with...


Cut the boards to whatever size you want your tray to be. I wanted mine a little bigger than the one I bought at Rod Works. I made mine 21" x 11". 


I ended up cutting the end pieces in half. I just thought it looked better.You can see that in the finished picture. Before you attach the ends, you need to put the handles on. 


Fun project.  I just painted it white then rubbed dark stain on it after I sanded it a little.  I think it cost about $10.  Give it a try.


Linking with these awesome parties:
Trash 2 Treasure
Tutorials & Tips Link Party
Tutorial Tuesday
Inspire me Monday
Wow us Wednesday
Treasure hunt Thursday
Link Party Palooza


Friday, November 13, 2015

DIY Arrow

Well I went shopping with a client for some awesome pieces for the gallery
walls we are doing in her beautiful home, which I will show you a little later.
  But I ran upon this cute arrow at Hobby Lobby...


I really loved it.  It looks like it is just dry brushed and oh so sweet.  Well I almost bought it but then I thought, you know, I could make that really easy.  So I came home and found a piece of scrap wood that was really quite rough on one side, which I liked.  So I just drew out the pieces on the wood and cut them out with my scroll saw.  So simple, anyone could do it.  I just glued the pieces with wood glue. No nailing or sanding or anything.  Then I put a dark stain all over it and when it dried I dry brushed ivory craft paint on it.  So easy, and I got two out of the board.  Bingo! So here are mine.
I added the first to my dining room wall.  Did I need it?  No, but I just added it for fun.


I added the second to my gallery wall in my hall.  I think it just finished it off.  So fun and free!


So those are my easy DIY arrows that anyone can do.  Go make some and have a great day!


Linking up with these blogs:
Treasure Hunt Thursday
upcycled link party
Keeping it simple crafts
The Girl Creative
http://diyshowoff.com/category/other/that-diy-party/
Inspire Me Monday
Trash 2 Treasure
Tutorial Tuesday
Wow us Wednesday
Tutorials & Tips Link Party
Link Party Palooza
Thursday, July 30, 2015

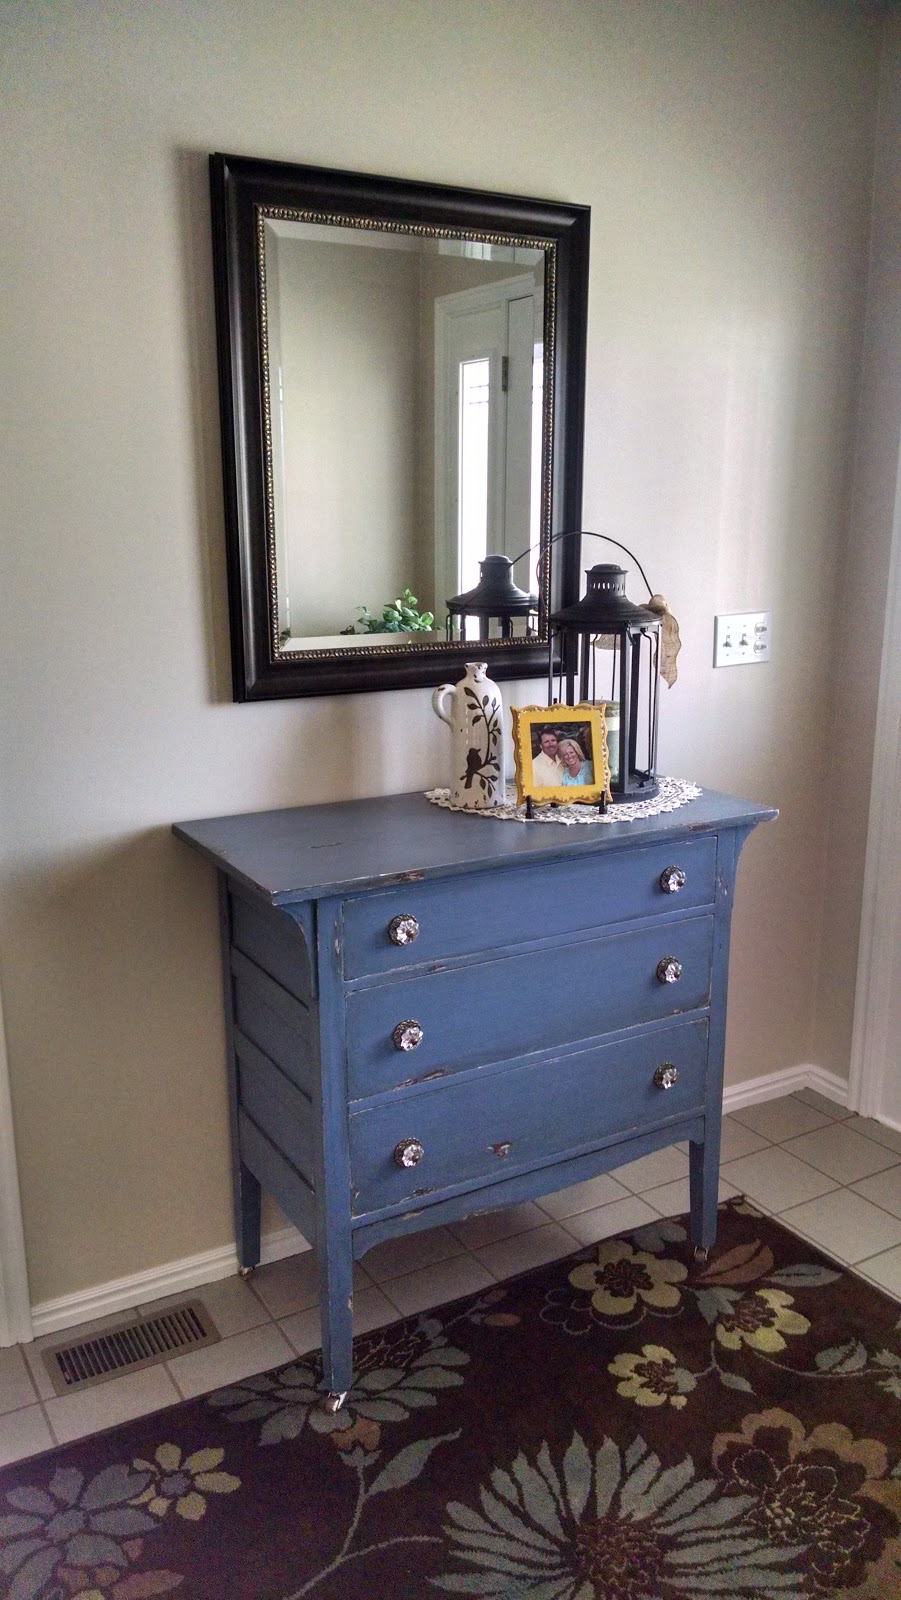
A dresser for the entry

I was at a friends house today and just noticed how cute her entry is.  I helped her decorate it years ago and I made this bench and shelf with hooks for one side.  It is the smaller side and the bench works out really well here.


But the other side has a longer wall and needed a table of sorts.  She used to have a sofa table type thing there but one day we were talking about getting something new for there and she remembered she had a small dresser that belonged to her husband's family.  I said "What, all this time and we could have been using it."  So she got it out of the attic and it was a little plain but I envisioned it with crystal knobs and a bright color.  We had just redone the living room off the entry and it has some blue in there so it was decided that blue would be perfect. 

We slipped in on down to our friend Michelle who painted it up with some chalk paint and distressed it. Oh my heck, it turned out perfect! It brought some color into the space and the knobs from Hobby Lobby really dressed it up. My friend is an awesome framer and she reframed a mirror that she already had.  We picked up a couple things for the top and of course a new rug and it was done.


What do you think about using a dresser for an entry table?  Maybe next week I will show you what we did in her living room right off this entry.
                                                   
                                                           Thanks for stopping by,
                                                                       Brooke


Linking with these great parties:
Frugal Friday
Link Party Palooza
Upcycled link party
Diy show off 
Trash to treasure
Tutorials & Tips
Wow us Wednesday 
Treasure hunt thursday


Friday, November 5, 2010

Table to bench

I really hate this table.


It's a nice table. It was a hand-me-down from my mom years and years ago. It is solid oak. I mean solid. It is very heavy and well made. I just didn't like the style. I got this great idea one day when I was complaining about not having enough seating around my table....I'll cut that baby down and make a bench. So I did.
I used a jigsaw.
I measured my dining chairs and they were 18" high so that is what I cut the bench to. I took the brace off between the table legs...
and put it back on the bench with my handy dandy brad nailer.
Sanded.
Painted, two coats. Left over black from the murphy bed. Behr paint and primer in one from Home depot.
Sanded the edges for a distressed look.
Then I put Minwax Early American stain over the whole thing. Let it dry for a long time. Then I got to bring it in... the best part.
It sets right by my dining table.
And the best part, when I need it, it pulls up and I can sit two more adult behinds or 3 kid behinds.
Luuuuve it! Just in time for Thanksgiving! Now who's coming?
By the way, I'm thinking of painting my dining chairs black too, what do you think?


Participating in these parties:
http://www.sawdustandpaperscraps.com/2010/11/what-ever-linky-party.html
Keeping It SimpleThe DIY Show OffA Little Knick Knack Funky Junk's Sat Nite Special
Saturday Mornings HookingupwithHoH


Saturday, October 2, 2010

The making of a side table.

Changes! Sometimes I like changes. But, this change is one I will hate. My daughter will move out in less than a year to go to college. I can't talk about it or I will bawl. But it will happen and my middle son is so excited to have his own room, he can hardly wait. We put a queen bed in her room, recently. It is a small room so it is all bed, but my son will need a queen bed by the time he gets in there. He is growing like crazy.
I know that is a long way to get around to how I need a table but now I need a bedside table for this bed. (It also needs a headboard but that will have to be later.)
I have built alot of furniture in my craft/boutiquing days. But I had hung up my tool belt for a long needed break. I dusted it off for the murphy bed project so it was ready to go.
I used a 2x4 cut length wise for the legs. My table is 24 inches high.

Each side is a 1x6 cut to 12 inches long.
I drilled holes then screwed two screws in through the 2x2 leg and into the 1x6x12". Then I did the same with all sides. The top measures 18"x18". I glued and nailed it with finish nails.
I filled the holes with wood putty. The holes where the screws went in I filled with wood plugs.
I routed the edges and sanded the whole thing. Ooops! I forgot about the fake drawer. I cut a scrap piece of pine down to about 1x4x10". Glued a wood knob on and glued it to the front to look like a drawer front.

Now I have another problem. As I said, in less than a year my son will take over this room and it will be painted and redone. So I don't want to paint this table to match her room now, which would be white. I know that I will want it stained for his room along with whatever headboard I make. So anyway, here it is.

She will probably just use it unfinished. At least until I decide what to do. Changes, Humph!
This table was built for less than $20. Could be done cheaper if you just used planks on the top. I used a 18"x4' board that cost $15 but I have enough left for another larger table. Not bad!

I will be joining the linky parties below so go check 'em out.
Sumo Sweet Stuff The DIY Show Off The Girl Creative Keeping It Simple
Show and Tell Green
HookingupwithHoHGet Your Craft On Tuesday