Showing posts with label Decorating. Show all posts
Sunday, May 29, 2016

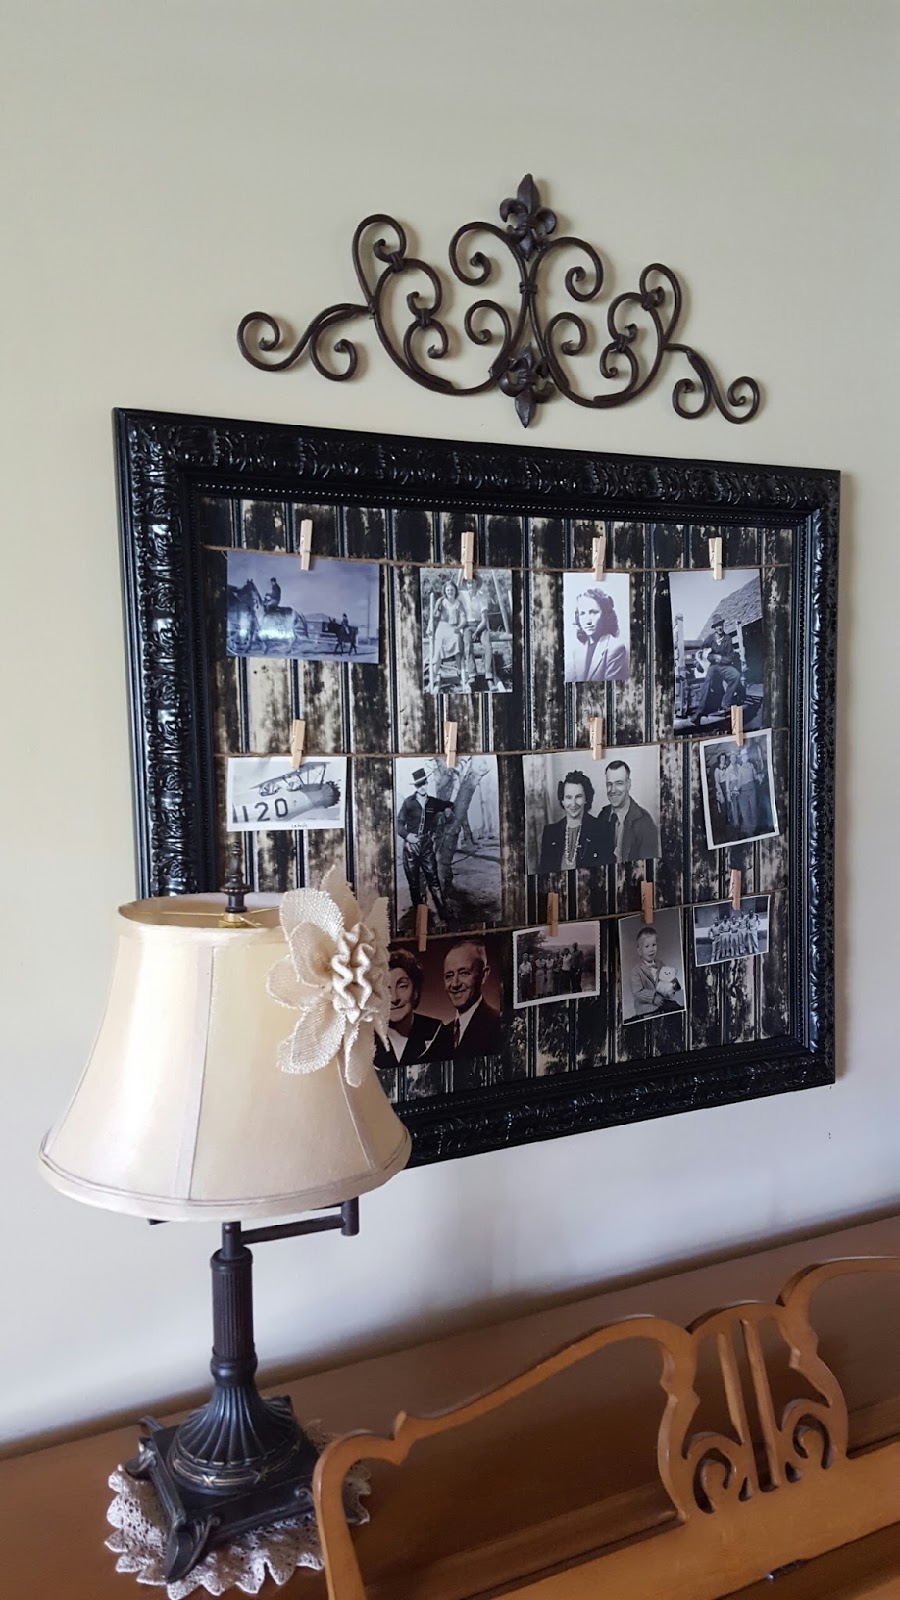
How to display old family pictures.


 This has been a project that I have been thinking about for a long time.  How to display old pictures.


I was definately surprised to find out how much my kids didn't know about their ancestors.  As I tell stories I want them to be able to put a face to the people.  So I found this old frame spray painted it black.

 Bought a piece of 2 x 4 beadboard at Home Depot and cut it to fit in the frame.  It comes white so I sprayed it black and sanded it to death.  Then rubbed a brown glaze on the top.  I decided to hang the pictures from jute so I hot glued the jute to the frame and nailed the beadboard into the frame.


 Then the fun part, finding old pictures to display and telling the stories that go with them.


How do you display your old family pictures?


 Linking with these great parties:
Dishing it and digging it
Keeping it simple MMM link party
Tutorials & Tips
Tutorial Tuesday
Wow us Wednesday
Be inspired
I'm lovin it, Tidy Mom
Link Party Palooza
Friday, November 5, 2010

Table to bench

I really hate this table.


It's a nice table. It was a hand-me-down from my mom years and years ago. It is solid oak. I mean solid. It is very heavy and well made. I just didn't like the style. I got this great idea one day when I was complaining about not having enough seating around my table....I'll cut that baby down and make a bench. So I did.
I used a jigsaw.
I measured my dining chairs and they were 18" high so that is what I cut the bench to. I took the brace off between the table legs...
and put it back on the bench with my handy dandy brad nailer.
Sanded.
Painted, two coats. Left over black from the murphy bed. Behr paint and primer in one from Home depot.
Sanded the edges for a distressed look.
Then I put Minwax Early American stain over the whole thing. Let it dry for a long time. Then I got to bring it in... the best part.
It sets right by my dining table.
And the best part, when I need it, it pulls up and I can sit two more adult behinds or 3 kid behinds.
Luuuuve it! Just in time for Thanksgiving! Now who's coming?
By the way, I'm thinking of painting my dining chairs black too, what do you think?


Participating in these parties:
http://www.sawdustandpaperscraps.com/2010/11/what-ever-linky-party.html
Keeping It SimpleThe DIY Show OffA Little Knick Knack Funky Junk's Sat Nite Special
Saturday Mornings HookingupwithHoH


Monday, October 18, 2010

Sharing

I made these boxes for a client a few years ago.
When I made them back then I painted them dark blue and there were four of them. She called about a month ago and wanted a new look for that wall. So we took the boxes down and did this new look.
She really loved the new colors and new shelf.
But she wanted to reuse the boxes somewhere. So I painted them red. I really like how the blue came through when I sanded them. I also rubbed on a brown stain to soften the red a little like I did on the shelf.
Before, I hung them vertically. This time, for a change, I hung them horizontally.
It was nice to reuse them and see the different options for them.
I can never remember to take pictures when I do a house so I am unable to share anything with you. I hope to do better at that. This time I remembered, amazing, so I am sharing.
Have a great day!

A Little Knick KnackHookingupwithHoHAll Thingz Related


Thursday, October 14, 2010

The dust collector

How many of you have one of these?

Are they dust collector's or what? I have been going to get rid of this tree for a long time. I finally got so sick of the dust I chucked it. Aaaahhh! it feels so good.
Now, what to put in the corner. I have been struggling with what to do with my old trunk, love it, don't know what to do with it. It has been here...
And here...
Didn't love either of those places. Now it is here...
Can you tip a trunk on it's end? I don't know. I did! I don't know how long it will stay there, but for now I kinda like it. I just grabbed some things I already had to put on it.
I had thought I would make a pillar of some kind to hold a large arrangement of sticks and florals, I guess this is it for now.
What do you think about putting a trunk on it's end?
Friday, September 24, 2010

My package

Everybody loves to get a package, right? I sure do, especially if it was free. Thanks to Katie @ Chirp in the forest
I actually won her drawing for that cute pumpkin. I have never won anything so I was thrilled.
This is what I decided to do with it. I have this candle lantern thingy.
I took out the hanging candles.
I just put them in the closet because I am sure I will put them back in sooner or later.
I gathered some bead garland, cut some leaves off another garland, gathered some pine cones from the yard and found some fall ribbon. Here is the finished project.
To make the pumpkin sit up a little higher I put a small scrap piece of wood in first to set the pumpkin on. I rapped the bead garland around and around the piece of wood. Stuck a couple leaves with pine cones in with the pumpkin on top. Tied a ribbon on the handle with another pine cone and WaLa!

This little vignette was free. I just used things I already had. Don't you just love free?
Thanks Katie!

Join  us Saturdays at tatertotsandjello.com for the weekend wrap  up           party!Funky Junk's Saturday Nite Special