Sunday, May 29, 2016

How to display old family pictures.


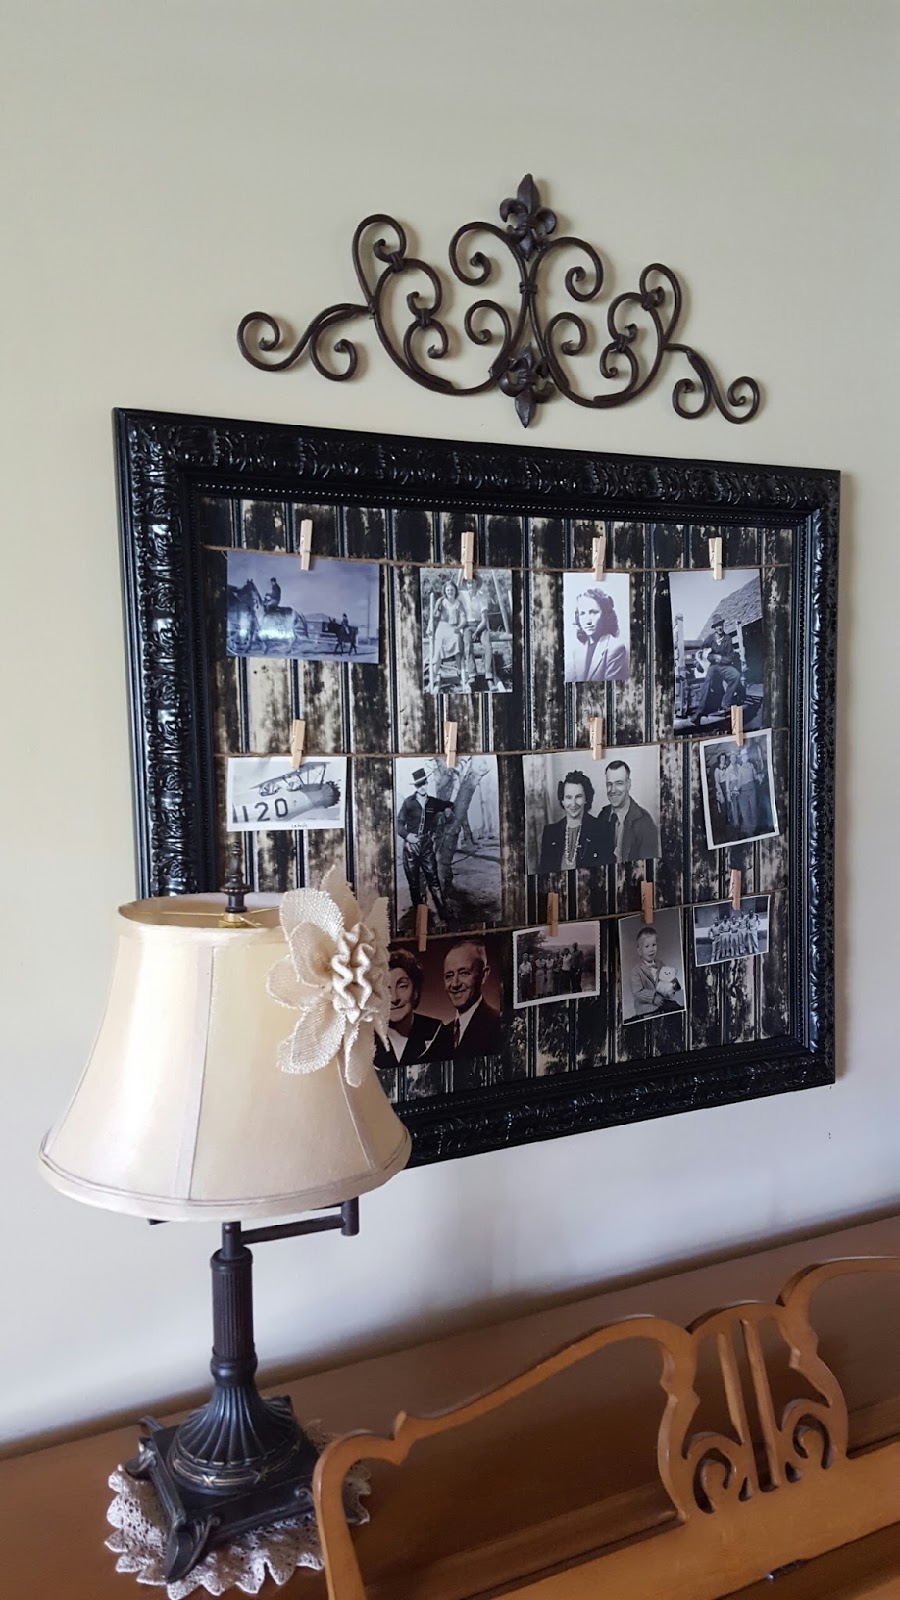
 This has been a project that I have been thinking about for a long time.  How to display old pictures.


I was definately surprised to find out how much my kids didn't know about their ancestors.  As I tell stories I want them to be able to put a face to the people.  So I found this old frame spray painted it black.

 Bought a piece of 2 x 4 beadboard at Home Depot and cut it to fit in the frame.  It comes white so I sprayed it black and sanded it to death.  Then rubbed a brown glaze on the top.  I decided to hang the pictures from jute so I hot glued the jute to the frame and nailed the beadboard into the frame.


 Then the fun part, finding old pictures to display and telling the stories that go with them.


How do you display your old family pictures?


 Linking with these great parties:
Dishing it and digging it
Keeping it simple MMM link party
Tutorials & Tips
Tutorial Tuesday
Wow us Wednesday
Be inspired
I'm lovin it, Tidy Mom
Link Party Palooza
Saturday, April 30, 2016

Tea towel pillow covers


Don't you just love the darling tea towels you see everywhere.  I found these at Rod Works and loved them but didn't know where to display them.  I had some pillows that I had made to sit on my chairs and they just happened to be the perfect size for these tea towels. 

My sewing skills are very limited but they were so simple. I just sewed up the sides and put the pillow in and sewed up the bottom.  I am sure you could just stuff them with stuffing too.


Fun change.  And so simple.  I love them.
Thanks for stopping by.


Sharing at these great blogs:
Inspire me Monday
Tutorials & Tips
Wow us Wednesday
Grace at home
Link Party Palooza
DIY Showoff
Dishing it & Digging it
Monday, April 11, 2016

Farmhouse in the Dining area


Oh my, I really love the farmhouse look.  I had to just keep going into the dining area.


  I got started with the chalkboard.  I looked online for a saying I could change it to.  Found this one about the dinner table I liked. I know it could use a little tweeking but it is fine for now.


The shelf, I found at Rod Works and it fit the "farmhouse" look perfectly.


I loved these 'buckets" not sure what you call them. Anyway, I decided to use them as shelves.  I cut a piece of barn wood to fit in them and make a flat surface to put stuff on.


The little chalkboard was just to fill in an empty space.  I drew the chicken with a chalk pen. I know, it's not the best looking chicken but its the best I could do.


So fun to look back and then see it now.
                                    Before...


                                    Now...


Now I have plans for my table and chairs but that will be a project for the summer.  But so far, I love the new look.  It feels like home.
Thanks for stopping by.


Will be sharing with these blogs:
Trash 2 Treasure
Tutorials & Tips
Tutorial Tuesday
Wow us Wednesday
Grace at Home
Link Party Palooza
DIY showoff
Be Inspired
Inspire me Monday
MMM Block Party
Pretty Project Party
Saturday, March 26, 2016

Adding a little "Farmhouse" to the kitchen


So I just love all the Farmhouse decor that is so trending right now.  I don't have white cabinets, nor do I really want white cabinets but I love the look.  I wanted to add some farmhouse to my kitchen sooo, I got a few things...


I went shopping.  I had the $50 dollar gift card that I got from being on Studio 5.  I also had some other coupons and I headed over to Tai Pan Trading, Quilted Bear and of course Rod Works.  I used alot of the things I already had too.  But I went from bright red with sunflowers to this more muted, neutral color pallet.  I really like it. I found the "Farm Fresh" tray at Quilted Bear.  I had the other items.


 These tin canisters are from Rod Works and I loved the white jar to break up the tin a little.


The "EAT" is also from Rod Works.
  

I got the cute rooster pic and the milk bottle from The Quilted Bear and I had the rest of the stuff.


Just a few items for the shelves at the end of my cabinets.  The kitchen is closed today...I wish!
I did some big changes in my dining area. I will share those a little later.  Thanks for stopping by.


Linking up with these great blogs:
Link Party Palooza
MMM Block Party
Dishing it & Digging it
DIY Show off
Trash 2 Treasure
Tutorials & Tips 
Tutorial Tuesday
Wow us Wednesday
Grace at Home

   
Saturday, March 12, 2016

It doesn't always have to be a wreath.


When I saw the watering can that Jen did over at Tatertots & Jello I knew that is what I needed for my front porch. So I found my watering can at Tia Pan Trading along with the faux lavender. I already had this old frame and some yellow spray paint.  A little pink ribbon and that was that.  I love how it turned out.  So bright and springy!


I have this old barn door from my childhood home.  I put it on the front porch so I just change out what I put on it seasonally.


I am sure we will still be getting snow here.  So I won't put out any spring pillows for a while yet but it sure is fun to "think spring". 


Have put any "Spring" out yet?


Sharing with these blogs:
That DIY Party
Inspire Me Monday
MMM Block Party
Turorial Tuesday
Trash 2 Treasure
Show and Share
Wow Us Wednesday
Grace at Home
Link Party Palooza
The Best DIY Salvaged Junk


Tuesday, March 1, 2016

Spring Mantel


Well it may be a little early but I am so ready!  Spring is around the corner so I had to bring it in to the house.


Maybe it will hurry it along if I spread it around the house. I really scored at Hobby Lobby this year.  Everything was 40% off.  I got the egg garland, speckled eggs, and Happy Easter sign.  


I made the "birds on a wire" last year.  I just found some bird shapes online and cut them out of spring colored scrapbook paper.  Then cut them out a little bigger in black card stock to frame them out.  I just hot glued them onto a jute string and that was it.  So easy, cute and inexpensive.


The "Spring" I also made last year. Just bought the letters cut out and mod podged scrapbook paper to them.  So simple.


Hope this helps bring spring a little sooner.  I can't wait!  How are you getting ready for Spring?


Sharing with:
Tutorial Tuesday
Trash 2 Treasure
Wow us Wednesday
Grace at Home
Link Party Palooza
That DIY Party
Wednesday, February 17, 2016

DIY Two Layer Shelves

Hi there, just sharing my diy shelves today.  These shelves were super easy to make and I think they add a little character too.


I used 1x2, 1x4, and 1x6 pine boards.  1x4's are for the back plate, 1x2's are for the braces, and 1x6's are for the shelf.  First I cut the back plates. I wanted two shelves but I think you could do as many as you wanted.


Just to rough them up a bit, I used this scraper and gouged the edges a little.  Then sanded them to smooth it out.


Then it was time to put it all together.

I used wood glue and a nail gun to do this.  It worked great. Then I stained them with an espresso stain and a spray poly for the top coat.


Both sides of the window.


 I love how they turned out.  Very simple, anybody could make these.

Have a good day!


Sharing with these parties:
Wow Us Wednesday
Pretty Project Party
Grace at Home
Link Party Palooza
Be Inspired Link party
That DIY Party
Link Party #84
Trash 2 Treasure
Tutorials and Tips
Wow us Wednesday