Monday, August 30, 2010

Where do you blog party.

Have you been to the "Where do you blog party?" Over at centsationalgirl.com There are some really great spaces, very inspirational. I thought, since I have just fixed up my space recently, I would show mine too. This space is a large closet we turned into an office space. It is located right at the beginning of my main hall so it is in the main living space so as not to be away from the rest of the family.


Since I am not the only one to use this space, I love that it is right in the living area. That way I can just pop on the computer when ever I need to and I can keep track of the kids when they are on. That is where I blog now hop on over to the Where do you blog party and see where everyone else blogs too.

Brooke
Friday, August 27, 2010

Laundry room show & tell

A few weeks ago I did a post on laundry organizing. I had some people ask me some questions about my laundry room. So even though I am thinking of redoing my laundry in the near future, I thought I would show you the things that really work in there.
A few years back I realized there was a huge problem with shoes in my laundry/mudroom. Everyone came in that door (off the garage) and kicked off shoes until there was a huge mountain of shoes and it became difficult to get in the door.
I found a solution that I have loved ever since. I bought some MDF board and went to work. Since there are five people in our family I made 5 shoe slots, spots, or bins whatever you want to call them.
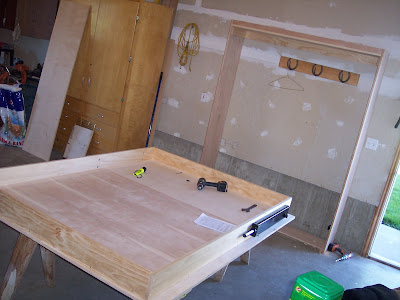
I put a board on the top for a bench to sit and put shoes on or take them off. Above I put the coat hangers. This has really worked. Everyone has their own slot and just kicks their shoes off into their slot. I put some batting and material on the top of the bench and just hot glued the ruffle on to finish it off. I then needed a place to craft and also to fold clothes. So I built this folding table that flips back when not in use. It is attached to the bench and the wall.
Here it is folded out.
I use this to fold clothes, crafts, and scrapbooking. I just put a 1x2 board on the wall to hold the table up when it is folded out, like this.
Underneath the table I keep all my scrapbooking supplies.
I also needed a place for the ironing board. I don't iron very much, actually very little. I hate to have to drag a big ironing board out somewhere and then put it back whenever I use it. So I bought one of those ironing boards that are suppose to hang on the back of your door. You know what I mean, right? Looks like this.
I built a box around it and hung it on the wall. Now I have one of those great built in ironing boards that cost alot but mine was cheap. I know the blue pad doesn't match but it really doesn't matter because it is never out. Ha!
I put a door made from 1/2 inch thick MDF board and painted it the color of the wall so it doesn't stand out.
So I hope that answered some questions. These things have really been useful in there and were not hard to do. I am wanting to maybe paint in there and do a little update. I really hate the cabinets in there and hope to do a makeover on the doors soon. Until then I guess I will go do some laundry. UGH!


Thursday, August 19, 2010

What is a murphy bed? I'll show you.

Okay, so here it is. The "BIG PROJECT" the hubster and I have been working on. Finally finished.
So what is it? An armoire? No. T.V. Cabinet? No. It is a Murphy bed. Just so you know there will be no tutorial on the making of this bed. If you ever attempt one of these, number 1. You are nuts! number 2. You will need more direction than I can give you, some serious instructions and measurments.
So this is where it all started. We puchased the mechanism for the muphy bed and with it came instructions on making it and the wood we needed to purchase. We bought it at Allwood Furniture in Salt Lake City, Utah.

After about 10 days we made it to here.
So when the bed is up in the cabinet the front is suppose to look like an armoire. You can have cabinet doors made but that is expensive so I decided we could make fake doors and drawers with just some trim and fake drawer fronts. Then put handles and knobs on them and they look real. I then started the yucky job of painting, I hate to paint. I decided black was the color so off to Home Depot I went. "Behr paint and primer in one, please." I have to say this is really great stuff. 2 coats later...
A little sanding around the trim (I mean doors) and crown molding.
Then I put 2 coats of this stuff in satin finish. It recommends 3 coats on the can but I had had enough!
Here it finally is in its place.
Here are the handles I got a Home Depot to further the look of cabinet doors...
And here is how this thing works...

"Where is the mattress?" you say. Well we had to order it because it is a full/double size and the store we went to didn't stock them because they aren't that popular. Hu! So next week we will be accepting guests but no sooner!
And of course, any flat surface cannot stay un-accessorized for long in this house, sooo...
We saved $1000 buckaroos by building this ourselves.  We spent $1500.   Maybe in about 5 years we will forget about the blood, sweat and tears that went into it and we will say "It was worth it" but for now I do love how it looks in the room and it will be great for an extra bed when needed. 
How do you like it?

New Friend FridaysBuild{hers} club Button


Keeping It SimpleUndertheTableandDreamingFunky Junk's Sat Nite Special


The Girl Creative http://linda-coastalcharm.blogspot.com/The DIY Show Off
HookingupwithHoH http://www.thethriftyhome.com


Tuesday, August 17, 2010

What to do with an extra cabinet door.

A friend of mine told me she had found a couple cabinet doors and didn't know what to do with them. I told her I had seen people in the blogging world make message boards out of them. Then I remembered what I did with the one I found out in the shed at my mother-in-law's and thought I would share that with you. This is a gorgeous door with alot of detail.
I must first explain our kids bath. When we built I thought it would be a great idea to be able to shut off the shower and toilet area seperate from the vanity. We have one girl and two boys who use this bathroom and so while one is showering or using the toilet others can use the vanity. This has worked out well. Except for one thing, well two things, wish it was bigger and when you are in the shower/toilet room and you run out of soap, toilet paper or other items used in this area, you have to call out to whomever is out there and willing to help or sneak out in your towel etc. I needed a little storage in there. But, it is a very small room. Above the toilet is the only place. Now we can get back to the cabinet door.
Perfect size for a cabinet above the toilet. I built a box a little smaller than the door out of 1x6 pine and put two shelves in the middle.

Trimmed it around the edge with 1x2 pine and wa-la! With a little stain, hinges and a knob for the door, it was done. This cabinet is just the right depth so it doesn't feel too big in the room but holds alot of necessities.
Here is what it looks like in its place.
With a little accessorizing, of course.

That is what I did with an extra cabinet door. What have you done with yours?
Have a great day!